Optomechanics – SOLVED: Elastic Theory’s Differential Equations for the Tensile Stresses in Glass Lenses Mounted in Threaded Metal Rings

Colleagues:

AEH has solved elastic theory’s differential equations for the tensile stresses in glass lenses mounted in threaded metal rings, and it’s good news.

Paul Yoder had originally proposed Delgado and Hallinan’s 1975 solution (Opt. Eng. 14) but their solution gave very high tensile stresses in the lenses, high enough that virtually all such lenses should have fractured.  None of my ring mounted glass lenses had ever suffered that fate.  I surveyed a number of my colleagues and none of them recalled a ring mounted glass lens fracture.

Delgado and Hallinan’s work was flawed.  To correct their flaw would require a new solution to the equations of elasticity that honored the appropriate contact geometry.  AEH finally made it happen and the result is surprisingly simple,

s = p(1-2u)/b,

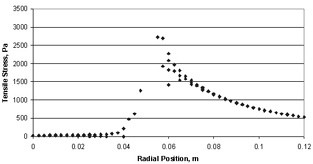
where s is the peak tensile stress, p is the linear ring load, b is the radius of the contact ring and u is the Poisson’s ratio of the glass.  This stress is three-to-four orders of magnitude lower than that predicted by Delgado and Hallinan.

Using Nastran AEH was also able to verify the general shape of the stress distribution in spite of Nastran’s notorious difficulty at the point of load application.
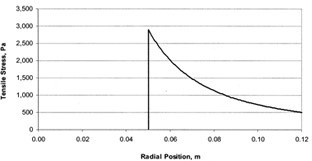

Closed-form solution       >>>         Nastran solution

To learn more you have choices:  Either download AEH’s peer reviewed paper from SPIE [Optical Engineering 57(5), 055105] or go through the gory details with me in my tutorial,

“Optomechanical Analysis,”
SPIE’s Optics and Photonics Symposium in San Diego
8:30 AM to 5:00 PM on the 21st of August.Cheers!

Al H.
6-6-18

Optomechanics – Ivory > Nastran > Excel

Colleagues:

I have always found Excel to be one of the best optomechanical analysis tools. 

AEH has recently enhanced the Ivory3 Optomechanical Modeling Tools to make Nastran and Excel even more powerful for the optomechanical engineer.

It’s not that Nastran doesn’t do its job, but it’s only a finite element code.  For optical systems the engineer needs more methods and tools to interpret Nastran’s results opticallyIvory3 unleashes the power of Nastran into Excel to analyze optomechanical design issues:

Ivory3————————— into –>Nastran———- into —>Excel ——————-|

Optical prescription data    >   opto-structural model   >     LOS error contributors

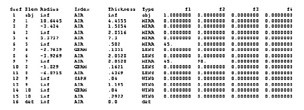
In this example Ivory3 puts the image registration errors (ie. line-of-sight) into Nastran’s output file, both the net effect and the element-by-element effects, which may be cumulatively summed and plotted in Excel for the engineer’s assessment.  Obviously elements 1, 5 and 11 are the big drivers in this LOS error problem.

When you need to stabilize your image AEH has the tools! Al H.
3-8-18

Optomechanics – Using CodeV Prescription in Ivory and Jade to Find Structural and Thermal Weaknesses

Colleagues:

I’ve been known to lecture my students and colleagues on the need to keep their tools sharp.  Some time ago AEH was invited to a design review as an observer and since I had no direct participation I sat at the back of the room, behind John, the systems engineer who was controlling the projector.  The technical sessions went well but about half-way through the schedule and budget sessions he suddenly blackened the screen and turned on the overhead lights.  He slowly turned and surveyed those of us sitting behind him.  His gaze settled on me!  “What, John?” I asked.  He stared at my hands which were holding my pen knife and its sharpening steel.  “Just keeping my tools sharp,” I declared sheepishly.

One of AEH’s sharpest tools, other than a pen knife, is Ivory’s Optomechanical Modeling Tools.  It’s been under continuous development incorporating many of my personal insights working as a mechanical engineer in the optics industry.  I recently put together an updated version and released it to all users of Version 3.  That’s another way I keep AEH’s tools sharp (and protect AEH’s Ivory subscribers, too).  Ivory is AEH’s prime tool for engineering thermally and structurally reliable optical systems.  It’s designed to work in both Excel and Nastran and its application early in the design process prevents much embarrassment and saves many labor-hours from preventable failures that may occur later in qualification tests and service.

Somewhat more recently AEH was invited to participate in a “Tiger-Team” review of a sub-contractor.  The initial issue was broken glass.  The first thing I did was get a copy of the physical optical prescription (CodeV) and read it into Ivory (for the structure) and Jade (for the broken glass).  I could then quantitatively infer where the principal structural and thermal weaknesses might be.  With that insight I was able to form an independent assessment of the completeness of the design team’s engineering effort, which undergirded my report to the prime contractor.

I hope to see all of you at SPIE’s Optics+Photonics in San Diego come August.  I’ll be teaching (Optomechanical Analysis), chairing (The Optomechanical Engineering Technical Group and Optomechanics 2017), presenting and publishing (on a new diffraction grating capability in Ivory) and begin planning our next SPIE Conference (Optomechanics 2019). 

That also keeps AEH’s tools sharp. 

Hasta luego, caiman.

Al H.
6-5-17

Optomechanics – How to Overcome Resistance from Management

Colleagues:

There is so much more to optomechanics than meets the eye (or ear or touch, even).  I learned a great optomechanical engineering lesson from a Quality Assurance engineer!

Gene was recruited (and offered a “bounty”) by a major manufacturer of lasers for printers to improve the quality of their products, ~1/3rd of which were failing in the 1,000 hour burn-in test.  Gene, in turn, called me in to supplement his electronics industry experience.  (Full disclosure:  We had worked together at one of our previous employers.)

We ran into resistance from both the Mechanical Engineering management and the Factory management.  The mechanical engineers would not let me “review or analyze” any of their design work and the factory would not let me “observe” their operations during working hours.  Hmmm….  Both Gene and I were dumbfounded.  But, I must say that Gene was a resourceful Devil.

He invited me to coffee at a nearby bistro and swore me to secrecy.  Then he laid out his plan:  He would dress me in a white QA smock, give me a clipboard, a jeweler’s loupe, a marking pen and spools of red, yellow and green adhesive dots.  I’d spend most of the day in his office but I’d go out to the factory floor on coffee breaks and lunch times.  I’d cruise the floor, stopping at empty work stations and pretend to inspect the stations, one at a time, applying the loupe and the colored dots (annotating a few, especially the red ones) while making notes on the clipboard.  At the end of each break I’d return to Gene’s office and hide-out.  It took about three days to cover each of the work stations twice.  Then he released me telling me to “disappear.”  I went back to AEH and made myself busy elsewhere.

The next I heard from Gene was a phone call from Norwood, Massachusetts.  The plan worked spectacularly, he had collected his “bounty,” left that company and moved with his family to more stable employment in Norwood.

The laser manufacturer is gone and I think Gene would approve of me sharing his secret with you now.

The lesson?  I think you got it.

Summer’s over and it’s downhill to the Great Pumpkin .  . Shhhhhhhhh!

Al H.
9-13-16

Optomechanics – Forensic Observation on Shock Test

Colleagues:

I was peering into the AEH archives the other day and got a shock.  I needed the source code that I use to analyze the effects of a variety of shock pulse shapes.  What I found was a complete set of mechanical engineering drawings for the medium-weight hammer blow shock test machine at the Hughes-Fullerton facility!  John Martin, who ran the test lab, gave them to me after AEH succeeded in getting a client’s Optical-Nav system qualified for Navy shipboard minesweeper service.

AEH’s job was to specify the shock isolators.  To understand the problem I had prepared a massive Nastran model of the system (6 feet high, two feet square and 550 pounds) mounted on an array of Aeroflex wire-rope isolators.  The numbers had said it should pass the shock test, but it failed.  AEH was called to the lab.  The bolts holding the isolators had stripped the threads in the isolator flanges!  I spent lunch-time with the Nastran output file reviewing the loads and forces and couldn’t make sense of the results.  The client thought that larger/stronger isolators were required.

I went back to the test lab and re-inspected the failed isolator mounts.  I found that the threaded ends of all the failed bolts were flush with the inside surface of their isolator flanges and that all of the un-failed bolt-ends protruded into that sway-space by about 3/16ths of an inch. 

I returned to the Nastran file, looking at displacements in stead of forces.  It predicted that the isolators would use virtually all of their sway-space.  The failed bolts had actually been pushed out when the isolators prematurely bottomed on the bolt-ends, not pulled out when the isolators stretched to their limits.  The bolts were too long.  Larger isolators were not necessary.

One fix was to put extra flat washers under the heads of the bolts so their ends would not protrude into the sway-spaces.  With that accomplished we returned to test the next day and PASSED!

That was AEH’s second successful adventure in John’s shock-test lab.  He graciously offered AEH the drawings for his test machine and invited me to present a paper at the annual conference of the Institute of Environmental Sciences, of which he was President.  I accepted both.

Engineers need to keep their forensic skills sharp, too!

Thank you John Martin!

Al H.
6-1-16

Optomechanics – Iterate Quickly Early

Colleagues:

Putting EO gear on Navy aircraft is a special sort of challenge, particularly if it’s external stores.  Not only does it have to pass the normal shock and vibration tests, it has to pass the rigors of catapult launches and arrested landings.

AEH was on the team that put active IR countermeasures into NavAir service.  The big challenge was the survival of the IR source which, until that time, existed only in the research lab.  We had to establish its fragility threshold (by testing) and then design its installation to survive the cats-n-traps of carrier service.  The solution turned out to be custom, AEH-designed, shock isolators and snubbers, one of AEH’s applications of the principles of optical flexures.  It was a six-degree-of-freedom “kinematics” problem with about a dozen degrees-of-freedom in the kinetic (design) solution, and non-linear at that.  Great fun!

There aren’t always “canned” tools that the engineer can apply.  This case required writing an interactive numerical integration routine that could be iterated quickly to explore the effects of the numerous design variables.  Spreadsheet approaches were too cumbersome so source-code was written and compiled.  The engineer could quickly modify the design variables and/or computational parameters and rerun the problem.  This enabled a thorough survey of the design space, demonstrations of numerical stability and, ultimately, the determination of the most favorable design configuration.

It’s always good to have a source-code compiler around.  It also helps to keep your other tools sharp.

AEH:  Finding engineered solutions.

Spring must be coming.  The apple trees are in full bloom!

Al H.
2-29-16

Optomechanics – An Engineer’s Tactile Sense

Colleagues:

It’s 2016 so, here we go….

For starters, I moved the AEH offices again.  See the new contact info below. 

Now, I’ve told you the story about the number of rivets in the Queen Mary.  Well here’s one about my calibrated thumb.

Early in my career my boss, Wilford, invited me to the environmental test laboratory.  We found a space payload mounted on the shake table.  He turned to me and asked, “What’s the fundamental resonant frequency of this beast?”  I turned to go up to the Structures Department but Wilford called me back.  He said something like, “We’re the mechanical engineers and should be able to get a pretty good handle on this right here.”

Wilford asked me, “How much do you think it weighs?”  I estimated the dimensions, studied the construction and made a guess.  He raised an eyebrow, but nodded.

Then Wilford walked around the payload and pressed on it several places then beckoned me over suggesting I press on it, which I did.  He asked how much it had moved.  I hadn’t noticed the motion so I pressed again and told him how much motion I had observed.  He asked how hard I had pressed but I had no idea.  He took me to the Inspection Department and had me push on the scales with the same force I’d pushed on the payload.

We went back to Wilford’s office and on his whiteboard he wrote “2 x pi x f = (k/m)^.5,” “k = force/motion” and “m = weight/gravity.”

The next day the test engineer reported that Wilford’s resonant frequency estimate, f, was 3% high.  Not bad.

My estimate wasn’t as good as his but I learned a lesson:  It’s useful for an engineer to maintain a tactile sense of the magnitudes of forces.  I cater to my right thumb.  What about you?

One more tool to keep sharp in 2016.

As I said up-top… “Here we gooooooooo!”

Al H.
1-5-16

Optomechanics – SOLVED: Differential equations of elasticity for the maximum tensile stress in glass…

Colleagues:

Those of you who are familiar with my expression,

s(x)=-s(y)=pb(1-2v)/(a+b)^2,

for tensile stresses in a ring-mounted glass lens (SPIE, 7424-14, 2009) should be delighted to know I didn’t give up there.  I recently solved the differential equations of elasticity for the maximum tensile stress in the glass for a short line-contact load,

s(x)=-s(y)<P(1-2v)/(2pL^2).

In this expression s(x) is the tensile stress, s(y) is the compressive stress, P is the total load, v is Poisson’s ratio for the glass and L is the length of the line contact. 

As in the prior case these stresses are much lower (by factors of perhaps 1/1,000 to 1/1,000,000 depending on the length L) than those predicted by the erroneous Delgado and Hallinan method used by optical engineers since the 1970s.  In the limits, where L approaches either 0.0 or infinity, my expression approaches those in the classic literature (ie., Timoshenko and Goodier), just as it should. 

And it worked!  The low stress level opens up a whole new family of design options.  Just another one of those “small things” that brings joy to an optomechanical engineer’s heart. 

Oh, in my new expression “<” means “less than” because I integrated only over the length, L, assuming the contact width was infinitesimal.  That suited my engineering (worst case) purpose.  There’s still time for some grad student to integrate over the finite width for the full solution.

We’re just keeping AEH’s tools sharp, too.

Oh, October… the Great Goblin was enchanting but the little kids were TRULY GREAT!!!

Al H.
11-2-15

Optomechanics – Save your Budget: Identify Problems Early

Colleagues:

How does a mechanical engineer identify problems early?  He or she runs estimates and analyses, maybe solving two or three degree of freedom (DOF) lumped-parameter problems via simultaneous equations in a spreadsheet.  Estimating surface temperatures on the outside of a cast housing comes to mind with simultaneous radiation, convection and conduction needing to be considered. 

But, throw in optical imaging behavior and the number of equations explodes.  The optomechanical engineer deals with not only the structural and thermal equation but also the 49 equations for each optical element’s effect on the system’s image.  For even modest optical systems this swamps the engineer’s conventional methods.  Who’s going to solve a 100+ equation problem in a spreadsheet?

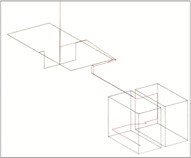
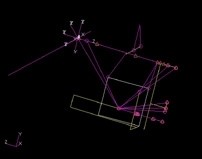
It’s one thing to write about lumped-parameter optomechanical modeling. It’s a whole other thing to actually do it.  The optomechanical engineer needs optomechanical toolsHere’s a “relatively simple” 874 equation (DOF) optical/structural lumped-parameter model:

All of the 784 optics equations were modeled in AEH/Ivory and imported to the MSC/Nastran lumped-structural model (90 equations) for numerical solution.  The Nastran run identified critical thermal alignment challenges, the solution to which enabled a successful telecoms product.  Assembling and running simple lumped-parameter optomechanical models saves budgets, saves schedules and snatches success from the jaws of failure.  That’s engineering.

If you have questions give AEH a call.

I’ll talk more about this in San Diego at SPIE’s Optics+Photonics Symposium, come August.  We’ll have a two-day conference, poster sessions and an evening meeting of the Optomechanical Engineering Technical Group.  It’ll be a great time with technical exhibits, banquets and camaraderie.  I hope to see you all there.

Meanwhile… identify problems early, stay on top and keep your tools sharp!

Al H.
6-10-15

Optomechanics – Prepare for Success Early

Colleagues:

Optics is an art that’s just meant to work… until it doesn’t. 

The optomechanical engineer’s job is to survey the available mechanical design spaces looking for optical problems.  The engineer identifies the problems early, gets on top of them and stays on top all the way through.  MSC Software Corporation recently published a Case Study on this subject.  Here’s the link—

Optomechanics at MSC

Many problems can be anticipated and avoided by using relatively simple, lumped-parameter models in the beginning of a project.  If the project waits until the distributed properties are well defined it may be too late and the budget and schedule considerations may even shut the project down.  Optomechanical analysis is at least an order of magnitude trickier than the individual disciplines alone.  So the engineer has to have tools, and that means being able to couple the structure to the optical behavior in a single code.  AEH uses MSC/Nastran and AEH/Ivory.

Here are two examples, one a success the other a failure.  Both were gimbal-stabilized telescopes of roughly the same size:

The failure was a project that would not let the lumped parameter LOS model be run in the beginning but insisted that the analysis model be prepared from the finished engineering drawings.  The full-up analysis showed an unstable LOS.  Redesigned solutions were possible but costly. This project was cancelled. 

The successful project was able to demonstrate sufficient margin of safety with the lumped parameter LOS model that a full-up optomechanical model wasn’t needed.  The structural engineers could concentrate on strength and safety.  This project was fielded. 

Neither outcome was intuitive or obvious at the projects’ beginnings but their results couldn’t have been more stark.

Powerful tools, simple models, early in the project:  The eye-candy may be poor but the numbers can save the engineer’s buttons.

Spring is lovely in Pasadena.  I hope you’re enjoying it as much as I am.

Al H.
5-14-15